-

-
400 South Salina St. Suite 201,
Syracuse, NY 13202


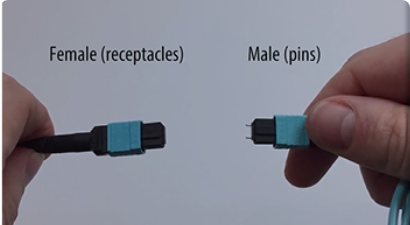
MPO CONNECTOR GENDERS - CABLEXPRESS RESPECT LAYER ONE
Learn the difference between male and female MPO (or MTP®) connectors, and the potential problems that can arise from getting them mixed up. With an MPO, the gender is determined by pins and receptacles for those pins. Mating two male or two female connectors won't work and can result in dangerous alignment problems, leading to costly downtime. Avoiding this is important.
Watch Video

DIFFERENCES BETWEEN MULTI-MODE AND SINGLE-MODE FIBER CABLES - CABLEXPRESS RESPECT LAYER ONE
Distinguish multi-mode and single-mode fiber optic cables based on physical and application differences. Multi-mode is commonly used in data centers and should be OM3 or OM4. Single-mode, used in long-haul applications, has higher cost active electronics.
Watch Video

FIBER END FACE POLISH TYPES - CABLEXPRESS RESPECT LAYER ONE
Let us review common end face polishes of fiber optic connectors popular in data centers. PC, UPC, and APC are covered in the video. Different types of polish exist to address back reflection. An illustration of two fibers mated together shows that light usually passes from one fiber to the next without issue. Back reflection refers to the light that is reflected back to the source.
Watch Video
FIBER FOR QSFP AND SFP+ - CABLEXPRESS RESPECT LAYER ONE
Learn about fiber cabling for QSFP and SFP+. These are used for 10G and 40G networking speeds. In many network designs, you’re going to need to convert from a QSFP to four SFP+. The length, the staggering, and the light path are going to be absolutely critical for this.
Watch Video
COPPER TRUNK CABLES - CABLEXPRESS RESPECT LAYER ONE
What are the uses and measuring techniques for our copper trunking products? In this video, we answer this and more. Measuring copper trunks is relatively easy. You only need about four simple measurements to be accurate. A correct measurement will ensure that you significantly minimize the installation time.
Watch Video
FIBER OPTIC CABLE LINK LOSS - CABLEXPRESS RESPECT LAYER ONE
Are you facing fiber optic loss in your data center? If so, this video is going to help you understand how and where fiber optic link loss happens in your data center. We will also analyze how that affects your structured cabling system.
Watch Video

OM3 AND OM4 FIBER - CABLEXPRESS RESPECT LAYER ONE
OM stands for optical multi-mode. OM3 and OM4 have been around for years, but OM4 was just recently ratified in 2009. The difference between OM3 and OM4 fiber is bandwidth - 2,500 megahertz versus 4,700 megahertz. You can determine if you want to opt for OM3 or OM4 on the basis of your requirements.
Watch Video
MIGRATING FIBER FROM 1G TO 10G - CABLEXPRESS RESPECT LAYER ONE
What are the aspects that you need to consider for fiber optic cabling when migrating from 1G to 10G? Ethernet speeds, understanding fiber types, OM1, OM2, OM3, and OM4, and the supported distances. While evaluating this, remember that 62.5 or OM1, can go 33 meters at 10-gig speeds. 50-micron OM2, can go up to 82 meters; OM3 which is also 50-micron fiber, can go up to 300 meters; and for OM4, which is also 50-micron, can go up to 550 meters.